Friday, September 27, 2013

Fix "Your IMAP server closed the connection" Error in Outlook by Disabling Automatic Send Receive

We recently added IMAP access to a customer's Bellsouth account in their unused Outlook 2007.  All was well until the customer reported getting intermittent Outlook errors stating:

"Your IMAP server closed the connection. This can occur if you leave the connection idle for too long"


and a balloon popup stating:

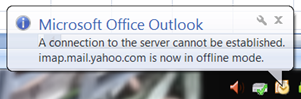
"A connection to the server cannot be established.  imap.mail.yahoo.com is now in offline mode"


We verified the IMAP settings, extended the automatic Send/Receive settings interval, but nothing seemed to work.

Finally we stumbled on a suggestion to disable the Automatic Send/Receive entirely because IMAP is actually a "live" connection and doesn't require a scheduled Send/Receive.  We turned it off and lo and behold the errors stopped.


We tested sending an email and it sent immediately.  We replied to the email, and it arrived in the user's Inbox within a reasonable amount of time (within a minute).

This is the first time we have ever had this kind of problem with a user's IMAP account in Outlook, and typically the error would point to too many concurrent connections to your IMAP server.

In this case, apparently the scheduled Send/Receive was overlapping the "live" connection and causing these errors to popup.

Wednesday, August 28, 2013

Migrate Outlook 2010 Autocomplete Store to new Outlook 2010 Profile or to Outlook 2013

We have plenty of situations where either a customer with Outlook 2007 needs us to create a new Outlook 2007 profile and copy their NK2 file over (just rename the NK2 to match the new profile name), or where someone is transferring their Outlook 2007 NK2 file from one computer to a new one with Outlook 2010 (easily accomplish this via the Microsoft FixIt).  This was all fine and good, but we have recently begun encountering people who need to migrate their autocomplete data to a new Outlook 2010 Profile or to Outlook 2013.

The difference is that Outlook 2010 got rid of the NK2 file that was so easy to transfer and replaced it with a specially named DAT file, tied to its associated profile.  There's not an issue when you upgrade from 2007 to 2010, or from 2010 to 2013, but what if you switch from a POP email to an IMAP or Exchange email account and need a new profile, or get a new computer that has Outlook 2010 or 2013, and you want to migrate your autocomplete data?

There is not a lot on the subject, and the suggestions that are out there are very differing.  The one method we will detail below works flawlessly, and is recommended by Microsoft Support, but assumes you have access to the old profile and the prior Outlook is actively working and available.  Until Microsoft gets around to producing a FixIt for Outlook Autocomplete DAT file migration, this appears to be the best option:
  1. Exit Outlook, and then close Outlook Web Access or Outlook Web App (OWA) on all workstations that are connected to the user mailbox.
  2. Download MFCMAPI from http://mfcmapi.codeplex.com
  3. Run mfcmapi.exe.
  4. On the Session menu, click Logon.
  5. If you are prompted for a profile, select the desired profile name, and then click OK.
  6. In the top pane, locate the line that corresponds to your mailbox, and then double-click it.
  7. In the left-side navigation pane, expand Root Container, and then expand Top of Information Store or IPM Sub Tree.
  8. Right-click the Inbox folder, and then click Open Associated Content Table. This action opens a new MFCMAPI window that contains various properties.
  9. Under the Subject column, right-click the item that has the subject IPM.Configuration.Autocomplete, and then click Export Message. This action opens the Save Message To File window.
  10. In the drop-down list, select MSG file (UNICODE), and then click OK.
  11. Select a folder location to which you want to save the message, and then click Save. Note this location.

Wednesday, July 31, 2013

Fixing the Hard Drive Controller when Transplanting Old Hard Drive into New Windows PC or Laptop - Fix Stop: 0x0000007B Error

We often have customers who love the way their Windows computer was configured with icons in certain places, a particular background, various free or paid programs installed, customized for them, and it was always painful to tell the customer that when their motherboard died, or they wanted to get a new computer, Windows would have to be re-installed, and all of that would have to be re-configured.

If you were to transplant a hard drive previously installed with Windows from one PC into another PC, with a different motherboard and different hard drive controller, upon boot up you would likely get a BSOD with a 0x0000007B error like this:


We sought out to find a way to transplant a used hard drive from one Windows computer into a brand new or used one, with a different motherboard and hard drive controller, without requiring a re-install of Windows, Applications and backup/recovery of all the data on the drive.

The method detailed below has been performed by us now dozens of times and works very well.  Please let us know if you attempt this procedure and have any questions about the process:
  1. First obtain the UBCD4WIN boot CD utility from here: http://www.ubcd4win.com/downloads.htm
  2. Follow the steps listed here to create the CD: http://www.ubcd4win.com/howto.htm
  3. Install your old hard drive in the new computer.
  4. Turn on computer and boot off the CD
  5. Boot into the live environment
  6. Go to Start > Programs> Registry Tools > FIX_hdc> Fix hard disk controller


  7. Assuming your target Windows install is in C:\WINDOWS, push M on your keyboard.
  8. Observe any further prompts and take action if necessary.
  9. Reboot and remove the CD from the drive, you should now see your Windows OS booting up!
P.S. Assuming you are transplanting your old HDD into a new computer designed to run Windows 8, there are additional settings you need to change in the BIOS to enable this to work.

Friday, March 22, 2013

Insufficient disk space to continue indexing - Fixed by relocating Index to another drive

One day recently, on my personal Windows 7 Home computer, I began noticing that indexing of my Outlook Exchange box was incomplete.  I know that in those situations, I can go to Indexing Options in Control Panel, then Advanced and click to Rebuild the Index, but a strange problem occurred.  The Indexer showed an error I'd never seen before: "Insufficient disk space to continue indexing. Search results might not be complete".

This was even more strange considering I have a 2TB C drive with 1.8TB free!

I tried rebuilding the index, just to encounter the same error.  I edited the registry to force Windows Search to restart/rebuild itself, but had the same issue.

Finally after troubleshooting for what seemed like hours, I found craigp's thread outlining his success on this post entitled "Indexing "insufficient Disk Space Error"" here (about 4/5 down the page): http://forum.wegotserved.com/index.php?/topic/10310-indexing-insufficient-disk-space-error/

He had moved his Index Location to his D drive and that fixed it.

Not having another physical internal drive to point the Index to, I went ahead and partitioned my C Drive and created a 10GB L:\ Drive (I had a lot of drive letters already in use).  I created a folder called Windows Index in the root of that drive (you should make a folder in your new location for the Index to go).

I then went back to Indexing Options in Control Panel, then Advanced and clicked the Select New button to specify a new Index Location path and pointed it to L:\Windows Index.


The Index proceeded to rebuild, and is now working fine!


Mac OSX Connection Failed Accessing Windows 7 Shares - Memory Allocation Error

We had a customer who wanted an inexpensive way to serve shares to about 10 computers in their office, and we put in a high-end desktop with Windows 7 Pro.  The "Server" worked fine for this purpose for all of the XP and 7 computers in the office, but the owner had an iMac which would consistently connect to the SMB shares and act fine, and then disconnect and not show any computers available on the local network.

We tried everything from going from wireless to wired, to checking sharing access, but nothing would fix it - it was always temporary and the next day we'd get a call that he was disconnected again.  His error would conssitently say "Connection failed: The server 'xyz' may not exist or is unavailable at this time" and look like this:


Finally we came across this article entitled "Windows 7 Nonpaged Pool Srv Error 2017" located here: http://alan.lamielle.net/2009/09/03/windows-7-nonpaged-pool-srv-error-2017

Essentially, the article states that in certain situations when Linux/Unix-based computers are accessing Windows 7 shares (Macs are Unix based), Windows can run into memory allocation issues.

The author of the post noted in the Windows Event Viewer that there was an Error 2017 reflecting the following:

Source: srv
Event ID: 2017
Level: Error
The server was unable to allocate from the system nonpaged pool because the server reached the configured limit for nonpaged pool allocations.


We checked our Windows 7 "Server" and sure enough had tons of this exact error.

The solution below, suggested in that article, worked for our client and they are no longer calling us about this issue:

On the Windows 7 computer, set the following registry key to "1":

HKLM\SYSTEM\CurrentControlSet\Control\Session Manager\Memory Management\LargeSystemCache

and set the following registry key to "3":

HKLM\SYSTEM\CurrentControlSet\Services\LanmanServer\Parameters\Size

Reboot the Windows 7 sharing computer and the problem should be solved.

Hopefully this works for you!